Blockchain GPU Task Example
In this section, we will use Swan Console to launch an example Blockchain GPU tasks deployment on the Swan Network. You can follow the same process for any other tasks.
1. Accessing the Marketplace
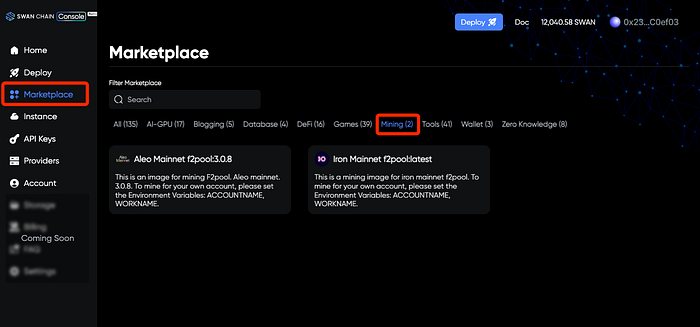
The Swan Chain marketplace provides access to various Blockchain GPU tasks pools. To begin:
Select “Marketplace” from the left panel
Navigate to the Mining section
View all supported Blockchain GPU tasks

2. Pool Registration
Using f2pool as an example:
Visit F2pool’s official guide
Complete account registration
Save your account name — you’ll need it for the deployment process.
3. Deployment Configuration
3.1 Pre-deployment Preparation
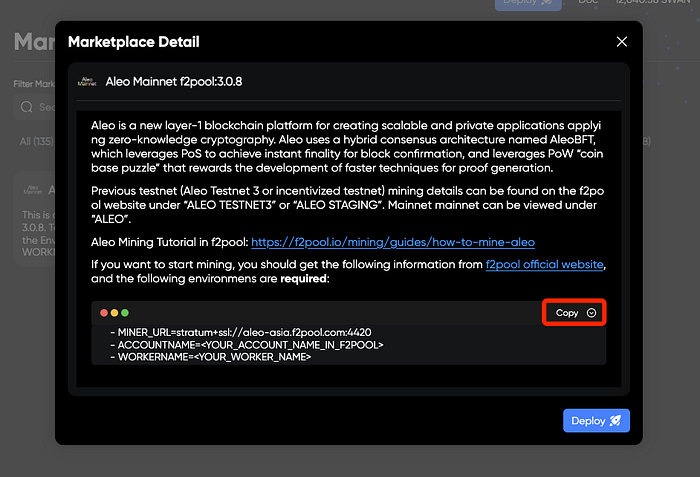
Before proceeding with deployment, you’ll notice a section containing environment variables. These variables are crucial for your deploy operation — they contain the connection details and authentication information needed to connect to the Blockchain GPU tasks pool.

Important: Save these variables securely — you’ll need them for the configuration steps.
3.2 Settings Configuration
3.2.1 Aleo Mainnet
Create a unique instance name (no specific naming rules)
Click “Add Environment Variables” to create more input fields. Remember that all F2pool images require three essential variables:
MINER_URL: stratum+ssl://aleo-asia.f2pool.com:4420
ACCOUNTNAME: Your registered F2pool account name
WORKERNAME: A unique identifier for this worker
Critical Note: Even minor typing errors in these variables can prevent successful connection to the mining pool. For detailed information about Aleo task on F2pool, consult the official documentation.
3.2.2 Iron Fish (IRON)
Create a unique instance name (no specific naming rules)
2. Click “Add Environment Variables” to create more input fields, Remember that all F2pool images require three essential variables:
MINER_URL: Choose the server closest to your location
ACCOUNTNAME: Your F2pool account name
WORKERNAME: Your chosen worker identifier
Available MINER_URL Options:
North America: stratum+ssl://ironssl-na.f2pool.com:1510
Europe: stratum+ssl://ironssl-euro.f2pool.com:1510
Asia: stratum+ssl://ironssl-asia.f2pool.com:1510
For complete Iron task instructions, visit F2pool’s Iron Fish guide.
3.3 Provider Selection
After setting up your environment variables, you’ll need to choose the hardware specifications for your deploy operation.
Swan Chain offers two distinct approaches for selecting a Computing Provider (CP):
Automatic Matching
System automatically matches you with suitable Computing Providers
Recommended for new users
2. Manual Provider Selection
Filter providers based on Geographic location, Hardware pricing and Provider account ID
PRO TIP: Check provider performance metrics via their account ID in the provider dashboard
NOTE: This option gives you more control but requires understanding of provider metrics
4. Final Deployment
Review all configurations thoroughly
Click “Deploy Now” to initiate the Blockchain GPU task
Note: If you see the “Not sufficient balance” notification, please follow the “Managing your SWANU accounts” steps to transfer SWANU.
Once you’ve deployed your Blockchain GPU task, give it 3–5 minutes, then head over to your F2pool dashboard. If you see hashrate and Blockchain GPU task data showing up, congrats! Your Blockchain GPU task is up and running.
5. Manage Instances
Through the Swan Console, you can:
Monitor deployment status in real time
View detailed performance metrics
Terminate Blockchain GPU tasks if needed
5.1 Deployment Dashboard Overview
To monitor your deployments on Swan Chain Console:
Navigate to “Instance” in the left panel
Click on "Instance" or “Mining Task” to view your deployment status
Here you can monitor:
Task running status
Resource usage
Connection status
Cost
Note: Costs are calculated and deducted every 12 hours. Make sure to maintain sufficient balance in your Escrow account to cover these periodic charges
5.2 Terminate Active Deployment
To close an active deployment:
Navigate to the Instance pane
Select the target deployment
Click the "Terminate" button
Confirm the blockchain transaction


Once terminated:
All associated costs will cease
Locked SWANU will be released
Resources will be deallocated
Last updated